 \n
\n
| Related Documentation | \nVersion of up.time affected | \nAffected Platforms | \n
| \n | All | \nAll | \n
Article \nContents \n
\n \nDownload Scriptomatic and locate the desired metric(s)
\n
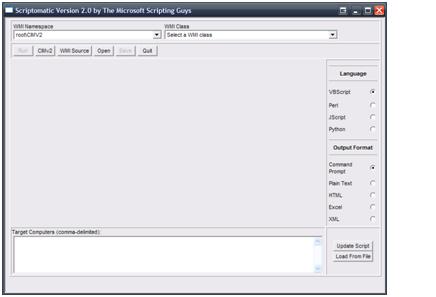
Scriptomatic is a Microsoft utility that allows you to create scripts that access the WMI counters built into Windows. You can get Scriptomatic from the Microsoft Download Center.
\n \nThe following screenshot shows the main Scriptomatic interface:
\n \n
\n
After selecting a WMI Namespace and Class, Scriptomatic will automatically generate a script to retrieve the associated values. Review the list of namespaces and classes to locate the metric(s) that you are interested in. Note that you may need to contact Microsoft or your systems vendor to determine where the counters are located (Google also helps). An example of system memory information is provided below:
\n \n \n
\n
You can also test the script by clicking the Run button, which will bring up a command line window with the following output:
\n \n \n
\n
Once you have a script that successfully retrieves the required values, some changes will be needed to enable it to work with up.time.
\n \nAllow Remote WMI Requests
\n \nThe initial script should work for the local system but it may not work when retrieving values for your remote servers. The script can be placed on all the remote systems but this complicates the installation and setup process and also presents scaling issues. Making the small modifications described below will allow the script to retrieve metrics from your remote servers with a properly authenticated method.
\n \nMore detailed information can be found in Connecting to WMI on a Remote Computer on the MSDN website. \n \n
Example script from Scriptomatic:
\n \nOn Error Resume Next
\n
\nConst wbemFlagReturnImmediately = &h10
\nConst wbemFlagForwardOnly = &h20
\n
\narrComputers = Array("PSO-JPEREIRA2")
\nFor Each strComputer In arrComputers
\n WScript.Echo
\n WScript.Echo "====================================="
\n WScript.Echo "Computer: " & strComputer
\n WScript.Echo "====================================="
\n
\n Set objWMIService = GetObject("winmgmts:" & strComputer & "rootCIMV2")
\n Set colItems = objWMIService.ExecQuery("SELECT * FROM Win32_PerfRawData_PerfOS_Memory", "WQL", _
\n wbemFlagReturnImmediately + wbemFlagForwardOnly)
\n
\n For Each objItem In colItems
\n WScript.Echo "AvailableBytes: " & objItem.AvailableBytes
\n WScript.Echo "AvailableKBytes: " & objItem.AvailableKBytes
\n WScript.Echo "AvailableMBytes: " & objItem.AvailableMBytes
\n...
\n
The green code in the above example is the WMI Namespace and Class. Replace the namespace and class in the next section with the original values from above. The red text in the above example should be replaced with the following section to enable remote WMI requests (remember to use the original WMI namespace and class from the original code):
\n \nstrComputer = WshSysEnv("UPTIME_HOSTNAME")
\nstrUser = WshSysEnv("UPTIME_USERNAME")
\nstrPassword = WshSysEnv("UPTIME_PASSWORD")
\n
\nSet objSWbemLocator = CreateObject("WbemScripting.SWbemLocator")
\nSet objSWbemServices = objSWbemLocator.ConnectServer(strComputer, _
\n "rootCIMV2", _
\n strUser, _
\n strPassword, _
\n "MS_409")
\nobjSWbemServices.Security_.ImpersonationLevel = 3
\nSet colItems = objSWbemServices.ExecQuery("SELECT * FROM Win32_PerfRawData_PerfOS_Memory ", _
\n "WQL", wbemFlagReturnImmediately + wbemFlagForwardOnly)
\n
Since one of the “for loops” was removed, the outer “Next” will also need to be removed at the bottom of the script. Confirm that the script works properly before continuing to the next step.
\n \nFor example:
\n \n...
\n WScript.Echo "UserName: " & objItem.UserName
\n WScript.Echo
\n Next
\nNext
\n
\nFunction WMIDateStringToDate(dtmDate)
\nWScript.Echo dtm:
\n WMIDateStringToDate = CDate(Mid(dtmDate, 5, 2) & "/" & _
\n Mid(dtmDate, 7, 2) & "/" & Left(dtmDate, 4) _
\n & " " & Mid (dtmDate, 9, 2) & ":" & Mid(dtmDate, 11, 2) & ":"
\n& Mid(dtmDate,13, 2))
\nEnd Function
\n
Output Format
\n \nThe up.time monitoring station expects to see data in the following format:
\n \nvariable1 value1
\nvariable2 value2
\n
Clean up the script by removing the colon (:) from each of the variables that you want to report. For the list of metrics that aren't required, simply delete the lines in the script.
\n \nFor example, change the script from:
\n \nWScript.Echo "AvailableBytes: " & objItem.AvailableBytes
\nWScript.Echo "AvailableKBytes: " & objItem.AvailableKBytes
\nWScript.Echo "AvailableMBytes: " & objItem.AvailableMBytes
\n
To:
\n \nWScript.Echo "AvailableBytes " & objItem.AvailableBytes
\nWScript.Echo "AvailableKBytes " & objItem.AvailableKBytes
\nWScript.Echo "AvailableMBytes " & objItem.AvailableMBytes
\n
Create and import the monitor UI \n
\n \nThe monitor interface can be generated with the uptime Plug-In Monitor XML Generator. Please refer to Creating the XML definition for your plug-in service monitor for further assistance.
\n \nThe final monitor can be imported by placing the XML file in the up.time directory and running the following commands on the command line: \n
\n \n> cd <uptime_dir>
\n> scripts\erdcloader -x <xml_filename>
\n
Additional Step for Windows Monitoring Stations \n
\n \nIf the up.time monitoring station is running on a Windows platform, the following steps will need to be implemented to allow the VB script to run properly.
\n \nCreate a Windows batch file that contains the following command:
\n \ncscript "C:Program Files uptime softwareuptimescripts.vbs"
\n%UPTIME_HOSTNAME% %UPTIME_USERNAME% %UPTIME_PASSWORD% //nologo
\n
Edit the VBS script file created at the end of step 2 and change the following lines from:
\n \nstrComputer = WshSysEnv("UPTIME_HOSTNAME")
\nstrUser = WshSysEnv("UPTIME_USERNAME")
\nstrPassword = WshSysEnv("UPTIME_PASSWORD")
\n
To:
\n \nstrComputer = Wscript.Arguments.Item(0)
\nstrUser = Wscript.Arguments.Item(0)
\nstrPassword = Wscript.Arguments.Item(0)
\n
Next, edit the 'Script Name' field of the plugin monitor to point to this batch script. For example: "C:\Program Files\uptime software\uptime\scripts\<plugin batch script name>.bat"
\n \nAfter this step is completed, the plugin monitor should run the Wwindows batch script, which then runs cscript to execute the VB script.
\n